
A basement craft room is one of the most exciting spaces you can design in your home. Unlike main-level rooms that often serve multiple purposes, a basement gives you the freedom to create a fully dedicated creative studio. Whether you love sewing, scrapbooking, painting, Cricut projects, candle making, knitting, jewelry design, or DIY decor, having an organized and inspiring craft space makes a massive difference in productivity and enjoyment.
Basements are ideal for craft rooms because they offer separation from daily household distractions. However, they also come with unique challenges: lower ceilings, limited natural light, potential moisture concerns, and unfinished walls or floors. The key to a successful basement craft room is thoughtful layout planning, proper lighting, durable materials, and smart storage solutions.
Lighting is especially important. Since many basements lack strong natural light, you’ll need layered lighting: overhead LED panels, task lamps at workstations, and accent lighting to brighten dark corners. Flooring should be easy to clean and moisture-resistant — vinyl plank, sealed concrete, or laminate are excellent options. Storage should prioritize visibility and accessibility. Clear bins, labeled drawers, pegboards, and wall-mounted shelves help keep supplies organized and prevent clutter.
Another important factor is zoning. A well-designed craft room divides space into clear areas: cutting station, sewing desk, painting table, storage wall, display zone, and packaging/shipping station if you sell your crafts. Even in smaller basements, defining zones visually (with rugs, shelving, or furniture placement) makes the room feel intentional and efficient.
In this guide, you’ll discover 10 detailed basement craft room ideas that range from minimalist studios to colorful creative havens. Each idea includes a clear explanation, step-by-step setup instructions, and a materials list so you can confidently build your dream creative space.
Let’s transform your basement into a functional, organized, and inspiring craft room.
1. Bright White Minimalist Craft Studio
Introduction
If you want a clean, distraction-free workspace, a bright white minimalist craft room is ideal. This design maximizes light reflection, making even dark basements feel airy and open. White walls, simple furniture, and organized storage create a calm environment where creativity can flow without visual clutter.
This setup works especially well for small basements or multi-purpose rooms where you want flexibility.
What This Idea Is
A clean, white craft room focused on simplicity, organization, and strong lighting.
Step-by-Step How-To
- Paint walls bright white or soft off-white.
- Install large LED ceiling panels for even lighting.
- Place a long white worktable in the center.
- Add wall-mounted shelving above workspace.
- Use clear storage bins to maintain uniform look.
- Incorporate rolling carts for flexibility.
Materials Needed
- White interior paint
- Large worktable
- LED panel lights
- Floating shelves
- Clear plastic storage bins
- Rolling storage cart

2. Colorful Creative Basement Craft Room
Introduction
If creativity thrives in vibrant environments, a colorful basement craft room can spark inspiration daily. This design embraces bold accent walls, bright organizers, and playful decor while maintaining organization.
It’s perfect for scrapbookers, Cricut users, and mixed-media artists.
What This Idea Is
A bold, personality-filled craft space with bright colors and energetic design.
Step-by-Step How-To
- Choose one bright accent wall color.
- Keep remaining walls light for balance.
- Add colorful pegboards for tool storage.
- Use labeled bins in coordinating shades.
- Install adjustable task lighting.
- Add motivational wall art.
Materials Needed
- Accent wall paint
- Pegboard panels
- Hooks and baskets
- Labeled storage bins
- Task lamps
- Wall art frames

3. Sewing-Focused Basement Craft Room
Introduction
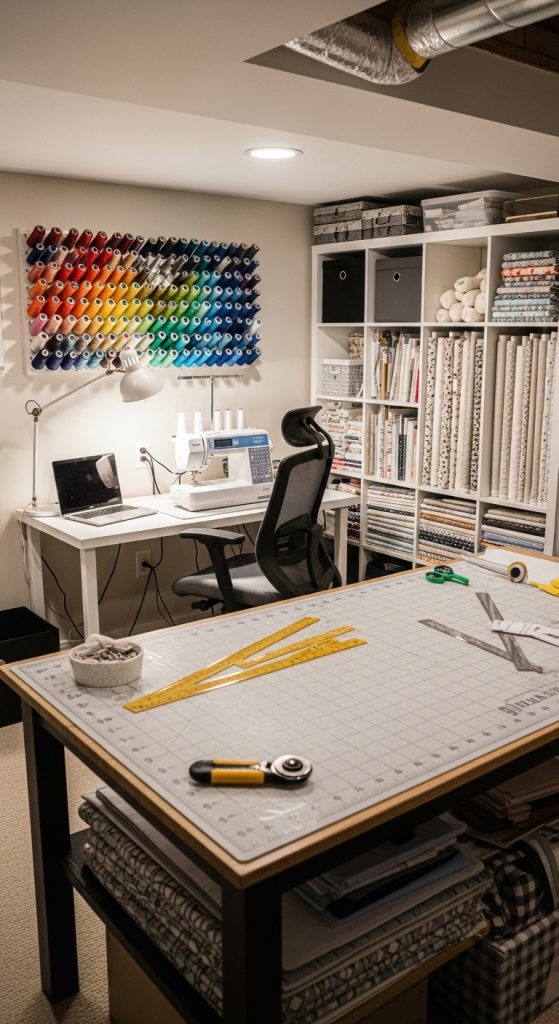
For sewing enthusiasts, layout efficiency is critical. This craft room idea centers around a dedicated sewing station with ample table space, fabric storage, and cutting area.
What This Idea Is
A craft room designed primarily for sewing and fabric-based projects.
Step-by-Step How-To
- Position sewing machine desk near power outlet.
- Add large cutting table beside it.
- Install wall-mounted thread racks.
- Store fabric in labeled cubbies.
- Include ergonomic chair for comfort.
- Add bright task lighting.
Materials Needed
- Sewing desk
- Cutting table
- Thread rack
- Fabric storage cubes
- Ergonomic chair
- LED task lamp
4. Pegboard Wall Organization Craft Room
Introduction
Pegboards are one of the most efficient storage solutions for basement craft rooms. They keep tools visible and easily accessible while saving floor space.
What This Idea Is
A craft room centered around a large pegboard storage wall.
Step-by-Step How-To
- Mount pegboard panels securely.
- Add hooks, baskets, and shelves.
- Arrange tools by category.
- Place worktable directly below pegboard.
- Label sections clearly.
- Install overhead lighting above board.
Materials Needed
- Pegboard sheets
- Wall anchors
- Hooks and baskets
- Worktable
- Labels

5. Dual-Station Shared Craft Room
Introduction
If two people use the basement craft room, creating dual stations ensures efficiency and harmony. This layout provides separate work areas while sharing central storage.
What This Idea Is
A divided craft room with two mirrored workstations.
Step-by-Step How-To
- Place two desks on opposite walls.
- Install shared storage in center.
- Add individual task lighting.
- Use rolling chairs.
- Color-code supplies for organization.
Materials Needed
- Two desks
- Shared shelving unit
- Desk lamps
- Storage bins
- Office chairs

6. Basement Craft Room With Island Worktable
Introduction
An island worktable in the center of the room maximizes workspace and encourages movement. This layout works best in larger basements.
What This Idea Is
A central island surrounded by storage and work zones.
Step-by-Step How-To
- Position large island table centrally.
- Install perimeter shelving.
- Add rolling drawers under island.
- Install bright overhead lighting.
- Keep pathways clear.
Materials Needed
- Large worktable or island
- Rolling drawer units
- Shelving
- LED ceiling lights

7. Craft Room With Built-In Cabinet Wall
Introduction
Built-in cabinets provide a polished, professional look while maximizing vertical storage.
What This Idea Is
A wall of cabinets dedicated to craft supply organization.
Step-by-Step How-To
- Install floor-to-ceiling cabinets.
- Use adjustable shelving.
- Add labeled bins inside.
- Place work desk opposite cabinets.
- Add under-cabinet lighting.
Materials Needed
- Cabinet system
- Storage bins
- Desk
- LED strip lights

8. Small Basement Craft Nook
Introduction
Even a small corner of a basement can become a productive craft nook with smart storage.
What This Idea Is
A compact craft setup optimized for small spaces.
Step-by-Step How-To
- Choose a quiet basement corner.
- Install wall-mounted fold-down desk.
- Add floating shelves above.
- Use stackable storage bins.
- Install bright task lighting.
Materials Needed
- Fold-down desk
- Floating shelves
- Storage bins
- Desk lamp

9. Rustic Farmhouse Craft Room
Introduction
A farmhouse-style craft room adds warmth with wood textures and cozy decor while remaining functional.
What This Idea Is
A craft room combining rustic charm with organized storage.
Step-by-Step How-To
- Paint walls soft neutral.
- Install wooden shelves.
- Use woven baskets for storage.
- Add large wooden worktable.
- Install pendant lighting.
Materials Needed
- Neutral paint
- Wooden shelves
- Woven baskets
- Worktable
- Pendant lights

10. Craft Room With Display & Packaging Area
Introduction
If you sell handmade items, adding a packaging and display area makes your basement craft room more business-ready.
What This Idea Is
A craft room layout including production, display, and packaging zones.
Step-by-Step How-To
- Set up main crafting table.
- Add shelving to display finished items.
- Install small packing station with supplies.
- Organize shipping materials in bins.
- Add bright photography corner for product shots.
Materials Needed
- Worktable
- Display shelves
- Packing table
- Shipping boxes and supplies
- LED lighting